Install JD Edwards Standalone E920
Author : JDEE1Tips
Install JD Edwards Enterprise One 9.2 Standalone Demo (Oracle version) on your PC or server with this step by step guide
Very Important:
a.
This version (according to the Oracle Docs) is designed to run on
Windows 7 x64, Windows 2012 R2, Windows 8.1 Even if you install
successfully in another version of Windows 64, some business functions
don’t work as expected, so, stay with Windows 7 or 2012 R2 or 8.1 x64
and everything should work as expected.
b.
Before you start with anything, turn OFF your Anti-virus, Firewall and
Disable UAC (User Access Control). For security purposes you could
enable again the Firewall and Anti-virus AFTER the installation was
completed.
c. From Release E920 OC4J is removed. So first we have to install Oracle Weblogic Server using 32 bit JDK
This
procedure was a result from information that I gathered from tips from
another users and “trial and error” tests. Suggestions and comments are
always welcome.
Let’s start!
-
Certification or MTR for JD Edwards Standalone can be verified from certification tab of support portal.
Tips: JD Edwards Standalone Certification can be verified under product “JD Edwards Development client”
-
We haveverified the certifications now, we need to install the below components to complete the installation of JD Edwards 9.2 Standalone Successfully.
-
Software Download
-
Prerequisites
-
Installation of Oracle Web logic Server
-
Installation of Oracle 12c Client
-
Installation of Oracle E1local 12c DB
-
Installation of Standalone Development client
-
Standalone 9.2, Oracle Welogic Server , Oracle 12c Client Setup files can be download from Oracle Software Delivery Cloud.
1.Software Download
In
the Oracle Software Delivery Cloud home page, login using your
credentials. Accept the “Export Restrictions” and this will lead to the
Product Selection screen. For Product select “JD Edwards EnterpriseOne
System Foundation” and Platform as “Microsoft Windows x64 (64-bit)“

JD
Edwards 9.2 Standalone Setup files comes in 4 zip files .This setup
files are divided in two parts JD Edwards Standalone components and
Oracle Database 12c components.

As
JD Edwards is 32 bit software, we need to install Oracle 12C 32 bit
clientfor DB connection. For Product select “Oracle Database Enterprise
Edition” and Platform as “Microsoft Windows x64 (64-bit)“

Download the Oracle 12C 32 bit software (V47124-01.zip) setup file.

Download the below Oracle Weblogic Sever (V44413-01.zip) Setup files from Edelivery.
For Product select “Oracle Weblogic Server Enterprise Edition” and Platform as “Microsoft Windows x86 (32-bit)“

Download the Oracle Web logic Server (V44413-01.zip) Setup file.

2. Prerequisites
JD Edwards E920 Standalone client requires some of the prerequisites software to works perfectly
-
Install 32 bit JDK – Oracle JDK 1.7.0_91
-
Install Microsoft Visual C++ RTL 2013 (x86 & x64)
-
Install Microsoft Visual Studio 2013.(Required for BSFN development)
-
Install PDF Reader, Chrome or Firefox
3.Installation of Oracle Weblogic Server
From Release 9.2, OC4J has been removed so we need to install Oracle Weblogic Server for installing Local Web client
The Standalone Web Client can be only Installed on Oracle WebLogic Server application server.
Extract
the download weblogic setup (V44413-01 zip)file in desktop or any
folder, we will get the jar file fmw_12.1.3.0.0_wls.jar.
Now
Open the Command Prompt as Run administrator and use cd command to
navigate to 64 bit Java Installed location( cd C:\Program Files
(x86)\java\jdk1.7.0_91\bin) and run the weblogic Server Installer using
the below command (Java -jar
c:\users\JDE\Desktop\fmw_12.1.3.0.0_wls.jar)

Enter
the Oracle_Home as per your requirement and once installation completed
uncheck the automatically launch the configuration wizard as shown in
the below screen shot and click on finish.

Note: No need to create a domain for web logic server
4. Install Oracle 12C 32 bit Client
From Release E920 with Oracle 12C 32 bit Client required non-administrator user for the Installation.
Unzip V47124-01.zip the file and run the Oracle Client Setup (“Setup.exe”) program as run as administrator.
Very important : Select Option 2 Administrator Option while installing Oracle DB 12c Client

Note : Oracle
12c 32 bit Client required non-administrator user for Installation,
during the installation Enter the non-administrator user for installing
Oracle 12c Client. If you already created non admin user use option 1 or
use option 2 allow OUI to create non admin user ID. Here we have
already created non admin user ID : oracle ,so using option 1

Now,
it’s time to install Oracle E1local DB 12c and JDE standalone Client
itself. The install process is divided in two parts: the first install
the Oracle Database and the second the JDE Client. The four files that
we downloaded earlier must be combined to make a working setup
installation extract the four files and you will have a folder structure
like this
V100564-01-zip, V97804-01-zip, V97805-01-zip, V97806-01-zip
-
Move the contents from folder V97805-01-01 to folder V97806-01
-
Move the contents from folder V97804-01-01 to folder V100564-01
-
Now Move the contents from folder V97806-01-01 to folder V100564-01\ThirdParty\ORACLE
Note : Now rename the Folder V100564-01 as standalone. It has the correct structured installation setup files.
5. Install E1Local 12c DB
From
Release E920, Oracle E1local DB 12C required non-administrator user for
Installation. Run the “InstallManager.exe”.Click Enterpriseone Oracle
12c Database Engine on JD Edwards Install Manager

In
the next screen as we already created Non admin user while installing
Oracle 12c 32 bit client, Use the Option 1 and provide the
non-administrator credentials and click on OK.

Once E1local Installed succesfully, Cilck on YES to reboot the machine

6. Install JD Edwards E920 Standalone Client
Once
Machine rebooted we are ready to Install JD Edwards E920 Standalone
client. Open InstallManager.exe as run as administrator. Click
EnterpriseOne Standalone client on JD Edwards Install Manager.

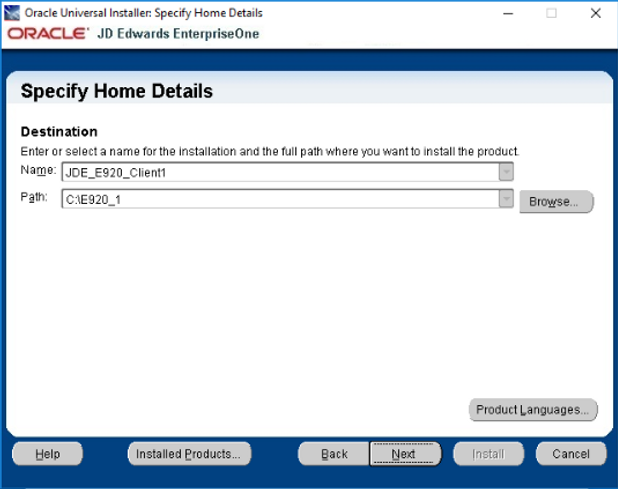
Enter the Installation path as per your requirement (i.e C:\E920_1)
In the Next screen the select the package and click on next

Tips: If you face error message “Unable to connect to Database” in this step.
Could
be the configuration issue with listener.ora & tnsnames.ora. Best
Practice Provide the Hostname(Instead of IP or Localhost) as machine
name in both the files.
Select the Development Option to install all the objects

JDK will not be shipped with E920 Installer. Install JDK and provide the path of the JDK as below and click on Next

Summary:
This screen will shows the information which we provided in the above
Steps. Verify it once more before we click on Install button.

JD Edwards Standalone E920 Installation will goes for minimum 2 hours and more (Its depends on the Ram of the machine the speed of the installation varies)
After
the Installation of JD Edwards Standalone client completed, Installer
automatically start to configure the Local web. During the local web
configuration. We need to provide the web logic password(welcome1) for creating the domain and managed server for local web client as shown below

Installation
of Local Web client will takes sometimes to configure the Local Web
client on Oracle Weblogic Server 12C. Click on Exit Once you received
below message.

Post Installation Task
Copy
the file tnsnames.ora from the location C:\Oracle\E1local\Network\ADMIN
to the location C:\app\Oracle\product\12.1.0\network\admin
Tips : Oracle 12c 32 client required for JD Edwards to connect to E1local (64 bit) DB
Open the JD Edwards icon on the desktop and Enter username: DEMO, Password DEMO

Now you will be Successfully Logged into DEMO920 Environment using Fat client.

Go
to Tools à EnterpriseOneMenu to start the local web client. It will
start the web logic server , now Internet explorer will open the web
client as shown below.

We have successfully installed JD Edwards Standalone 9.2 .Cheers!!!
Best Regards
JDEE1Tips
Training is our passion
I am getting "unable to locate security server" error after installing as per steps shown. Pls suggest.
ReplyDelete